Friday, December 20, 2013

Salami Cheese Ball - Perfect for the Holidays and Other Assorted Parties

This simple party snack can even be easier to prepare.  You don't have to make it into a ball.


It will be just as addictive in a bowl for a spread.


This was a mandatory tradition at Grandma's house for Christmas.  Since she has passed, I have taken over the simple duty.  I've also brought this to parties and had it my own gatherings.  Each time I have served this I have been asked for the recipe.

This is so easy, folks who have never turned on an oven can make this to impress many.  Non-cooks can finally take pride and credit for something they made, instead of bringing something pre-made from a market or deli.

Grandma never wrote down the recipe, so this is my 'eyeball' estimation, on the amount of salami to use.

Ingredients:

Approximately a 1 to 1 1/2 inch chunk of hard salami cut at the deli counter, diced and fills one      measuring cup
One 8 ounce package of cream cheese, room temperature
1/2 stick of (4 tablespoons) butter, room temperature
Crackers or pita chips
* very flaky crackers, like Ritz do not work well - they tend to crumble when spreading.  Crunchier crackers or pita chips tend to hold up better when spreading.

  
Slice and dice the salami the best way you can to get the smallest chunks possible, about a 1/4 of an inch.  When it fills a 1 cup measuring cup, you're done, and may have some slices left over for a sandwich.


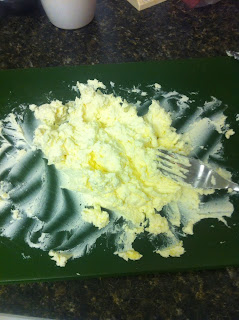
Slice the butter and cream cheese on the same cutting board used to slice the salami.  Don't let that extra flavor go to waste.  Mash it in there.

Mash butter and cream cheese with a fork until well blended.

Add salami, a little at a time, until all is used and all is blended well.
(Don't be afraid to turn the mixture over, you may find lots of salami cubes have settled to the bottom.)

You can do one of two things at this point:

Option #1:  Scoop into a bowl, cover and chill overnight, or at least 4 hours for flavors to marry.  Serve with crackers or pita chips.


Option #2: 


It's actually not too hard to form it into a ball, even with a fork.

Form into the best ball you can with the fork, then place on a plate with plastic wrap.

Fold the corners over.  When all wrapped, it's even easier to make into a ball -- like making a snowball.


Chill overnight or at least 4 hours for flavors to marry.  Serve with crackers.


Saturday, December 14, 2013

Chocolate Pecan Pie


You really won't believe how easy this is unless you read and try it for yourself.  You don't even need an electric mixer.

I have done this recipe with homemade pie crust, as well as the refrigerated and frozen crusts and pie shells.  However, I generally use one or two pre-made graham cracker crusts which seem to be a huge hit.  It may not look as pretty when served.  The mixture soaks into the crust and creates a toffee-like, chewy bottom, which seems to induce much eye-rolling and yummy sounds.  

This recipe with the graham crusts has become a favorite of my husband's, his co-workers and our friends.  So, here's the easy-peasy:

Pre-heat oven to 300 degrees F

1 or 2 ready-made graham cracker crusts

1 cup brown sugar, firmly packed
2 tablespoons of melted, salted butter (you can use unsalted if necessary)

1 teaspoon vanilla extract
1/2 teaspoon of almond extract

1/4 cup of unsweetened cocoa powder
3 eggs
1 cup light corn syrup or molasses
1 cup (8 ounces) of pecan halves or pieces

Add everything except eggs and syrup and nuts to a large bowl.  Mash together until well blended.  Add eggs and mix them in.  Add syrup and mix until throughly combined.  Add nuts and stir until distributed.

Pour into one pie shell, or evenly distribute to two.

Bake 60 minutes for one, 40 - 45  minutes for two, or until the middle has a slight spring-back to the touch.

If you leave the mixture to only one pie shell you may have some extra or overflow.  Cover cookie sheet with foil and place pie on top.  If you use two graham crusts you will definitely see graham on the top, but it usually crumbles during baking or slicing.

As I said before, this won't be the easiest or prettiest slice of pie that you have served.  But, because of the flavor and the now-demanded graham crust to make a chewy bottom crust, no one will worry about its appearance. 


Mexican Inspired Barley Soup


On snowy afternoons like this I get creative.  I only use ingredients I have on hand.  On normal weather days it's easy for me to run to the nearest grocery when I just need one or two more things to complete a recipe.  Not today.

Today I experimented making a soup that my husband loved so much, he's asked me to make it again after finishing his third bowl.  Thank goodness I took the time to write down the measurements.  Sometimes I just make stuff with a pinch of this, a sprinkle of that, and it never turns out the same.

I was going to leave this as a basic chicken broth recipe using thyme, rosemary and a bay leaf.  As I looked out to the snow-covered yard and yearned to be back in Cozumel, I thought the best way to add some Mexican sunshine was to add it to our lunch.

Making your own chicken stock is easier than it may sound. It gives purpose to the meaty bits from the bones instead of just throwing it away; and, the bones are what gives stock that extra hearty flavor.  But, I'm guessing store-bought stock will do the trick.

This recipe can easily be altered to a VEGAN dish.


You will need:
6 cups of chicken stock (or vegetable stock)
(that's about a box and a half of 32oz stock containers from the grocery)
makes about six 1 cup servings


Homemade Chicken Stock

1 carcass of a store-bought rotisserie chicken, including leftover skin and the juices at the bottom
4 stalks of celery, plus all the leaves in the middle
1/2 bunch of flat parsley
2 garlic cloves, crushed, sliced or diced
1 large onion, quartered with skin left on
1 teaspoon of salt
1/2 teaspoon pepper

Soup

1/2 teaspoon of Ancho chili powder (or regular chili powder)
1/2 teaspoon ground cumin
1/2 lime
Salt and Pepper to taste
3/4 cup of diced carrots
3/4 cup frozen corn
3/4 cup barley

Broken tortilla chips or homemade fried tortilla slices (optional)


To make the chicken stock, place the carcass in a stock or sauce pot and fill with water until it is fully submerged.  Place on stove and turn onto the highest setting.  Add the remaining stock ingredients and get it to boil.  Turn down to medium-low (about 3-4 on a dial) for a medium simmer, uncovered for 30 minutes.  Turn down to low for a slow simmer for another 1/2 hour to 45 minutes, until the onions layers have separated and translucent and the celery is translucent and flimsy.  The liquid should also be reduced between a 1/4 to 1/2 an inch.

Use a large bowl and strainer to separate the stock from the ingredients.  Pour stock into a smaller pot.

Add the chili powder and cumin.  Squeeze in the lime juice.  Warm the stock for 10 minutes on low and stir.  After 10 minutes, taste and add additional salt and pepper if needed.  You can even add in some extra lime, ancho or cumin if you want.  The taste is up to you.

When the broth has the flavor you want, add the carrots, corn and barley.  Bring to a boil.  Cover and turn the stove to low.  Simmer for 10 minutes.

Top with crushed tortilla chips (optional), or, make your own:


Slice a flour or corn tortilla.  Place in hot oil, fry for 2-3 minutes or until brown, place on a plate with a paper towel to drain remaining oil.


Sunday, November 24, 2013

Chile Pasilla and Garlic Soup - a Healthy Fiesta for Your Taste Buds


My three favorite things about visiting Cozumel, Mexico are diving, eating and grocery shopping to bring a bit of this beautiful island and country into my own cocina.  


I just came home from another delightful journey to Cozumel.  I can still feel the power of Nature's currents pushing us along fantastic drift dives.  I can still taste the tacos I had with a group of nine at Los Otates, where the entire bill for nine with dinner, water and beer cost us $77 US dollars.   I bought a heap of chiles I don't usually find in the international markets, or even in the local mercados, especially for the price I paid.

Today I tried a delicious soup from my new package of Pasilla Chiles.  Before trying, I've read that they are a lower to medium-hot pepper with a sweet, but smoky flavor with hints of cocoa, excellent for salsas, stews and soup.  These are sometimes used for mole sauces.  I also read that ancho peppers are mistaken for pasillas up here in the States, but are a good substitute if the real deal is not available.

This soup is wonderful for so many reasons.  It's vegan (without the sour cream), vegetarian, low carb, low fat and healthy.  Just guessing with the said ingredients, it's probably low-calorie and vitamin-packed.  It is also not too hot or spicy for those who prefer things that way.  It's savory, earthy and perfect comfort food in the colder months.

I found an easy, low-cost way to do this soup on the Food and Wine website.  I tried the recipe exactly, but found the soup slightly bland.  I know in my Mexican travels and recipes that not all Mexican cuisine needs to be spicy; however, I did need a bit more depth to remind me of the savory but not spicy flavors I was enjoying a week ago in soups and stews.

So, this is my altered recipe adapted from the Food and Wine recipe I found here.

I opted not to make my own croutons, and did not have an avocado on hand for the toppings.  I did not use crème fraîche, as the original recipe calls for.  I am just guessing that the average Mexican home cook on a budget tighter than ours use sour cream instead.


You will need:
large saucepan 
your favorite way to puree - food processor, stick blender, regular blender, etc.


  1. 3 large dried pasilla chiles
  2. 1 quart hot water, boiled
  3. 2 tablespoons olive oil
  4. 1 medium onion, coarsely chopped
  5. 1 head garlic, cloves peeled and coarsely chopped
  6. 1 large tomato, cut into 1-inch dice
  7. 1 teaspoon dried oregano, preferably Mexican
  8. 1 teaspoon powdered cumin
  9. 1/2 Tablespoon of concentrated tomato paste, or 1 Tablespoon of regular
  10. Salt to taste (start with 1/2 teaspoon, go from there)
  11. 1/2 of a lime
  12. 1/4 cup sour cream
  13. 1 Hass avocado, cut into 1/2-inch dice (optional)
  14. 1/4 cup cilantro leaves


In a large bowl, cover the chiles with the boiled water; set plate over the chiles to keep them submerged. Let soak until softened, about 20 minutes.


Strain and reserve the soaking liquid. Do this by taking out the chilies first, in what now should be finger-friendly warm water.  Squeeze gently to get more of the flavorful liquid and seeds out before straining. Stem (if necessary), seed and coarsely chop the chiles.


In a large saucepan, heat 2 tablespoons of the oil. Add the onion and garlic and cook over moderate heat until softened, about 5 minutes. Add the chopped chiles and cook, stirring, for 1 minute. Add the tomato, oregano, a pinch of salt and the strained chile soaking liquid and bring to a boil. Cover the soup and simmer gently over low heat for 20 minutes.


Working in batches, puree the soup in a blender, processor or your stick blender. Return the soup to the saucepan, bring to a simmer and season with salt to taste, tomato paste, cumin and squirt in the lime.  Simmer low and uncovered for 20-30 minutes to slightly reduce, thicken and marry the new additions.

Ladle the soup into bowls. Top with sour cream, avocado, cilantro leaves, croutons and serve.

Makes about four 1 cup servings.  (One cup for me, three for my husband)

Muy delicioso!

(Very delicious)!

Thank you for reading!

Sunday, September 15, 2013

Late Summer Happenings and Harvest

Cleveland Museum of Art
Cleveland Orchestra at Blossom Music Center
This Summer has been spectacular.  My husband and I have been busy attending fun events with family and friends such as museums, hikes, bike rides and swimming.  Outdoor concerts, like Ian Anderson performing "Thick as a Brick" and the Cleveland Orchestra performing Beethoven under the stars were particularly memorable.


A new friend asking for love
Within 10 minutes of discovery
Also, we had no choice but to adopt a kitten (about 6 months) who we found sleeping in one of our patio chairs.  We live in a rural area, where we often see feral cats wandering around and scoot away as soon as we go outside.  We just didn't have the heart to shoo a small kitten away who didn't want to leave.  He was too skinny, too hungry and too AFFECTIONATE.  After two flea baths and a clean bill of health from the vet we let him inside.  The poor little guy went straight to a fuzzy folded blanket on the sofa and slept for a full 12 hours.  It was probably his first comfortable, stress free day where he was able to truly relax.  Thankfully, he and our other two cats all get along quite well, and the little guy has NEVER tried to sneak out of an open door.  It's as if he was born to be an inside cat, or is just grateful to be indoors.   It's been two months.  He's almost doubled in size, but is even more gentle and lovable.  We couldn't have asked for a better feline to show up at our front door.

The second morning, not allowed inside yet,  but really selling himself


It's a small wonder that I had time to tend to my small deck garden.  The weather here was a bit funky.  It rained a lot in June and July, dry in August and September, and never got 'warm' enough.  Personally, I can't complain about the temperature, since it afforded me more time outside and cheaper electric bills from less air conditioning. 

This is one of my favorite times of the year.  In simple terms, it's the time when I can make stuff from the stuff I've been growing for a few months.  It's a sense of accomplishment.  I love making favorites like homemade marinara, caprese salad and fresh pico de gallo.
Jalapenos


I also went beyond my comfort zone and made an Asian-inspired dish.  I marinated chicken breasts in sesame oil, garlic, ginger and rice vinegar.  I stir-fried a few fresh peppers, onion, and water chestnuts in garlic and sesame oil, stir-fried the chicken, then tossed with cooked soba noodles, soy sauce and cilantro.  BIG HIT.


Plus, our recent plans for an upcoming vacation in Cozumel has inspired me to finish seasoning my molcajete and make a few other tasty experiments, such as making guacamole the traditional way and a favorite sauce that tastes almost as good as the restaurant where I first tasted it.  Next time ...


Monday, August 5, 2013

Easy Recipe for Bruchetta, Pasta and Pizza.


Years ago, in an old, cozy restaurant in Cleveland's Little Italy my family was served this savory tomato, garlic basil dip with our bread instead of the traditional olive oil and balsamic for dipping.  We've all had this topping baked onto bread but never as a dip with fresh bread.  Since then Mom has perfected her own method that's in high demand at all our family events.

It is ridiculously easy to make and very customizable to your own taste.
Plus, it's vegan and healthy, so it's ideal to take to a potluck for everyone to enjoy.  And, it's so versatile:
A topping or dip for fresh, crusty bread
Toss with pasta and chill, or saute with pasta for a hot or cold dish perfect for Summer dining.

Make traditional bruchetta or pizzas: place bread or English muffins under  a low broiler  or toaster oven for 2 minutes or until desired tostieness, add toppings, broil for another 2-3 minutes .  Or, quick for the kids, toast English muffins in toaster, add topping or toppings, microwave 30 seconds.

Fresh tomatoes would work well, I'm guessing, but we've never had it that way.  It looks like I may have a bumper crop of Romas this year, so I'm going to try making this with fresh and then update this post.


Before you start, Mom wanted to make sure I gave a few tips:

This is flavor-packed with lots of garlic.  If you think it may be too strong to your liking, start out with half the garlic and herbs.  This has to marinate for at least a day, so you can always add more seasoning later, marinate again, then taste.

Re-purposed spaghetti sauce jars work well.  This recipe makes a little under 32 ounces.  Two 16oz jars should do it.


*********


two 32oz cans of diced or petite diced tomatoes (tomatoes with Italian seasoning work great, but not necessary)

One full head of garlic, cloves peeled

2 cups fresh basil leaves

1/4 to 1/2 bunch parsley

1/2 bunch chives or scallions

1/4 teaspoon crushed red pepper flakes

1/2 teaspoon salt

one heaping teaspoon dry oregano (or 1/2 teaspoon of fresh)

1 1/2 cups of olive oil, extra virgin


Strain tomatoes in colander (Mom saves and freezes the tomato juice for future use in soups and sauces - no wonder they taste so good)


Put peeled garlic cloves and herbs in a food processor to chop


Add to tomatoes and add remaining ingredients.  Stir until combined.


Top off jar with extra olive oil.  Let stand at room temperature overnight.  Refridgerate afterwards.
As you may know, olive oil solidifies when chilled.  Be sure to restore it to room temperature before serving.