Friday, December 20, 2013

Salami Cheese Ball - Perfect for the Holidays and Other Assorted Parties

This simple party snack can even be easier to prepare.  You don't have to make it into a ball.


It will be just as addictive in a bowl for a spread.


This was a mandatory tradition at Grandma's house for Christmas.  Since she has passed, I have taken over the simple duty.  I've also brought this to parties and had it my own gatherings.  Each time I have served this I have been asked for the recipe.

This is so easy, folks who have never turned on an oven can make this to impress many.  Non-cooks can finally take pride and credit for something they made, instead of bringing something pre-made from a market or deli.

Grandma never wrote down the recipe, so this is my 'eyeball' estimation, on the amount of salami to use.

Ingredients:

Approximately a 1 to 1 1/2 inch chunk of hard salami cut at the deli counter, diced and fills one      measuring cup
One 8 ounce package of cream cheese, room temperature
1/2 stick of (4 tablespoons) butter, room temperature
Crackers or pita chips
* very flaky crackers, like Ritz do not work well - they tend to crumble when spreading.  Crunchier crackers or pita chips tend to hold up better when spreading.

  
Slice and dice the salami the best way you can to get the smallest chunks possible, about a 1/4 of an inch.  When it fills a 1 cup measuring cup, you're done, and may have some slices left over for a sandwich.


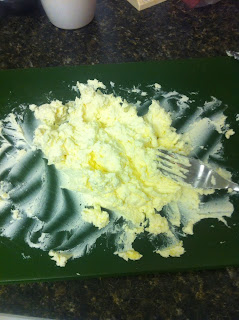
Slice the butter and cream cheese on the same cutting board used to slice the salami.  Don't let that extra flavor go to waste.  Mash it in there.

Mash butter and cream cheese with a fork until well blended.

Add salami, a little at a time, until all is used and all is blended well.
(Don't be afraid to turn the mixture over, you may find lots of salami cubes have settled to the bottom.)

You can do one of two things at this point:

Option #1:  Scoop into a bowl, cover and chill overnight, or at least 4 hours for flavors to marry.  Serve with crackers or pita chips.


Option #2: 


It's actually not too hard to form it into a ball, even with a fork.

Form into the best ball you can with the fork, then place on a plate with plastic wrap.

Fold the corners over.  When all wrapped, it's even easier to make into a ball -- like making a snowball.


Chill overnight or at least 4 hours for flavors to marry.  Serve with crackers.


Saturday, December 14, 2013

Chocolate Pecan Pie


You really won't believe how easy this is unless you read and try it for yourself.  You don't even need an electric mixer.

I have done this recipe with homemade pie crust, as well as the refrigerated and frozen crusts and pie shells.  However, I generally use one or two pre-made graham cracker crusts which seem to be a huge hit.  It may not look as pretty when served.  The mixture soaks into the crust and creates a toffee-like, chewy bottom, which seems to induce much eye-rolling and yummy sounds.  

This recipe with the graham crusts has become a favorite of my husband's, his co-workers and our friends.  So, here's the easy-peasy:

Pre-heat oven to 300 degrees F

1 or 2 ready-made graham cracker crusts

1 cup brown sugar, firmly packed
2 tablespoons of melted, salted butter (you can use unsalted if necessary)

1 teaspoon vanilla extract
1/2 teaspoon of almond extract

1/4 cup of unsweetened cocoa powder
3 eggs
1 cup light corn syrup or molasses
1 cup (8 ounces) of pecan halves or pieces

Add everything except eggs and syrup and nuts to a large bowl.  Mash together until well blended.  Add eggs and mix them in.  Add syrup and mix until throughly combined.  Add nuts and stir until distributed.

Pour into one pie shell, or evenly distribute to two.

Bake 60 minutes for one, 40 - 45  minutes for two, or until the middle has a slight spring-back to the touch.

If you leave the mixture to only one pie shell you may have some extra or overflow.  Cover cookie sheet with foil and place pie on top.  If you use two graham crusts you will definitely see graham on the top, but it usually crumbles during baking or slicing.

As I said before, this won't be the easiest or prettiest slice of pie that you have served.  But, because of the flavor and the now-demanded graham crust to make a chewy bottom crust, no one will worry about its appearance. 


Mexican Inspired Barley Soup


On snowy afternoons like this I get creative.  I only use ingredients I have on hand.  On normal weather days it's easy for me to run to the nearest grocery when I just need one or two more things to complete a recipe.  Not today.

Today I experimented making a soup that my husband loved so much, he's asked me to make it again after finishing his third bowl.  Thank goodness I took the time to write down the measurements.  Sometimes I just make stuff with a pinch of this, a sprinkle of that, and it never turns out the same.

I was going to leave this as a basic chicken broth recipe using thyme, rosemary and a bay leaf.  As I looked out to the snow-covered yard and yearned to be back in Cozumel, I thought the best way to add some Mexican sunshine was to add it to our lunch.

Making your own chicken stock is easier than it may sound. It gives purpose to the meaty bits from the bones instead of just throwing it away; and, the bones are what gives stock that extra hearty flavor.  But, I'm guessing store-bought stock will do the trick.

This recipe can easily be altered to a VEGAN dish.


You will need:
6 cups of chicken stock (or vegetable stock)
(that's about a box and a half of 32oz stock containers from the grocery)
makes about six 1 cup servings


Homemade Chicken Stock

1 carcass of a store-bought rotisserie chicken, including leftover skin and the juices at the bottom
4 stalks of celery, plus all the leaves in the middle
1/2 bunch of flat parsley
2 garlic cloves, crushed, sliced or diced
1 large onion, quartered with skin left on
1 teaspoon of salt
1/2 teaspoon pepper

Soup

1/2 teaspoon of Ancho chili powder (or regular chili powder)
1/2 teaspoon ground cumin
1/2 lime
Salt and Pepper to taste
3/4 cup of diced carrots
3/4 cup frozen corn
3/4 cup barley

Broken tortilla chips or homemade fried tortilla slices (optional)


To make the chicken stock, place the carcass in a stock or sauce pot and fill with water until it is fully submerged.  Place on stove and turn onto the highest setting.  Add the remaining stock ingredients and get it to boil.  Turn down to medium-low (about 3-4 on a dial) for a medium simmer, uncovered for 30 minutes.  Turn down to low for a slow simmer for another 1/2 hour to 45 minutes, until the onions layers have separated and translucent and the celery is translucent and flimsy.  The liquid should also be reduced between a 1/4 to 1/2 an inch.

Use a large bowl and strainer to separate the stock from the ingredients.  Pour stock into a smaller pot.

Add the chili powder and cumin.  Squeeze in the lime juice.  Warm the stock for 10 minutes on low and stir.  After 10 minutes, taste and add additional salt and pepper if needed.  You can even add in some extra lime, ancho or cumin if you want.  The taste is up to you.

When the broth has the flavor you want, add the carrots, corn and barley.  Bring to a boil.  Cover and turn the stove to low.  Simmer for 10 minutes.

Top with crushed tortilla chips (optional), or, make your own:


Slice a flour or corn tortilla.  Place in hot oil, fry for 2-3 minutes or until brown, place on a plate with a paper towel to drain remaining oil.